Capture the magic of summer with the Sunlit Waves & Ocean Breeze nail design—a blend of gradient blues, water ripples, and delicate plumeria blooms. Learn how to create this tropical-inspired look at home with our detailed guide.
There’s something almost poetic about the way sunlight dances on ocean waves. Imagine capturing that exact magic, right on your fingertips. The Sunlit Waves & Ocean Breeze nail design is more than just a style—it’s a mini vacation for your hands. With soft gradients, delicate ripples, and sweet plumeria blooms, this look is perfect for beach lovers, vacation dreamers, or anyone who wants to wear summer, anytime, anywhere.
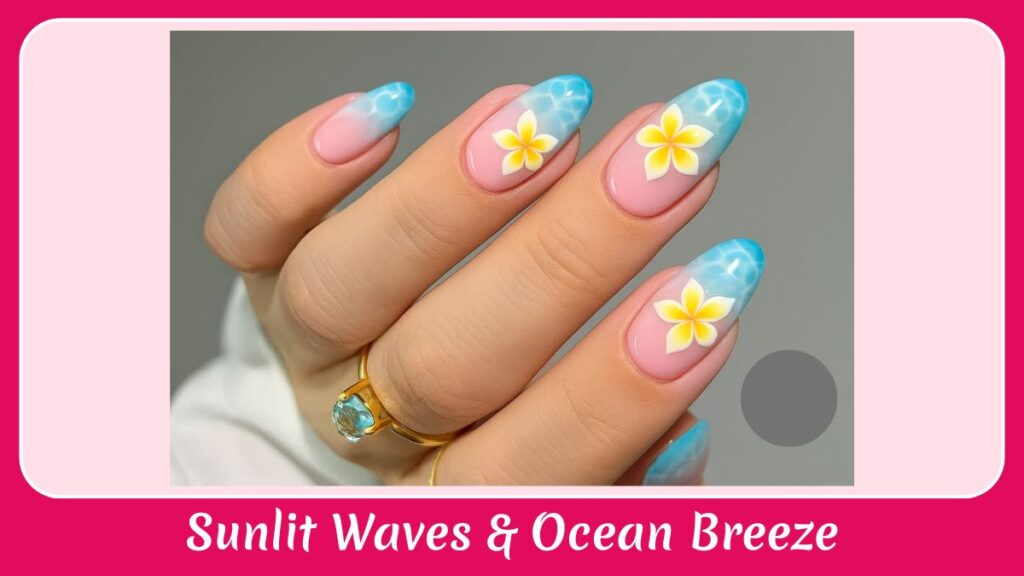
Sunlit Waves & Ocean Breeze
Picture this: your nails gently fade from soft nude to ocean blue, as if dipping into crystal-clear tropical waters. Tiny white ripples dance across the tips, mimicking sunlight reflecting off the surface. On select nails, petite plumeria flowers bloom with sunny yellow centers—adding the warmth of a Hawaiian lei to your fingertips.
This is not just another French manicure—it’s French with a tropical passport. The base remains sheer and elegant, but the playful blue gradient and delicate florals transform it into a design that’s both sophisticated and spirited. Whether you’re strolling along a seaside promenade or sipping mocktails poolside, this look will feel right at home.
Design Breakdown
At its heart, Sunlit Waves & Ocean Breeze is a fusion of two nail art worlds: the timeless French manicure and the free-spirited artistry of tropical nail design. The gradient technique blends nude and light blue to create a horizon effect—soft and airy. The white ripples add life and texture, while the flowers act as the design’s focal point, breaking up the flow with organic beauty.
Each element plays a role in telling a summer story. The nude base keeps things light and wearable, the blue tip captures that endless ocean vibe, the ripples bring movement, and the flowers remind you of the little joys—sun hats, iced drinks, and warm breezes.
Materials You’ll Need (Product: Its Use)
Before diving into the creative process, it’s important to have your nail art toolkit ready. The right products will ensure your design not only looks professional but also lasts through those sunny escapades.
Base Coat: Protects your natural nails and improves polish adherence
Sheer Pink or Nude Polish: Creates the French base for a clean and elegant backdrop
Light Blue Polish: Forms the gradient tip for the ocean effect
White Polish: Used to paint the rippling water texture
Yellow Polish: Adds sunny centers to the flowers
White or Very Light Yellow Polish: For painting the delicate plumeria petals
Fine-tipped Nail Art Brush: For precision detailing in ripples and petals
Makeup Sponge or Sponge Applicator: To create the smooth blue gradient
Top Coat: Seals and protects the design while adding shine
Acetone or Nail Polish Remover & Small Brush: Cleans up edges for a flawless finish
Step-by-Step: Painting Sunlit Waves & Ocean Breeze
1. Nail Prep: Building a Clean Canvas
Shape nails into soft almond or oval for an elegant, beachy silhouette. Push back cuticles, buff lightly, and apply a clear base coat to shield your natural nail. Let it dry fully before moving on.
2. Laying the French Base
Apply one to two coats of sheer pink or nude polish across the entire nail. This becomes the “skin” tone of your French base and will peek through the gradient for a refined finish. Allow to dry completely.
3. Creating the Ocean Gradient
Dab light blue polish onto your makeup sponge. Press gently on the nail tips, blending upwards into the nude base for a soft fade. Repeat until you achieve the dreamy ocean hue you want.
4. Adding the Water Ripples
Dip your fine-tipped brush in white polish and paint delicate, wavy lines across the blue tips. Keep the lines light and varied in length for a natural water reflection look.
5. Blooming the Plumerias
On your accent nails (like ring and index), use white or light yellow polish to paint five tear-drop shaped petals in a circle. Once dry, place a bright yellow dot in the center to complete the flower.
6. Sealing the Look
When all art is dry, coat with a glossy top coat for shine and durability. Clean edges with a small brush dipped in acetone.
Pro Tips for a Seamless Summer Vibe
A nail design like this is all about finesse. Here’s how to perfect it:
- Always work in thin polish layers to avoid a bulky finish.
- For the gradient, tap lightly with your sponge and don’t overblend—soft fades look more natural.
- When painting ripples, think of wind on water—keep strokes organic and imperfect.
- Let each floral element dry completely before adding the next color to avoid smudging.
- Apply top coat generously but float the brush to prevent dragging the design.
How to Keep the Sunlit Waves Shining Longer
Longevity comes from both technique and care. Start with a strong base coat and seal edges with your top coat. Avoid exposing nails to prolonged hot water, and use gloves during cleaning. Reapply a thin top coat every 3–4 days to refresh shine and prevent chips.
More Styles to Try
Where to Wear This Ocean-Kissed Look
The Sunlit Waves & Ocean Breeze design radiates holiday-ready charm. It’s versatile enough to work for both casual beach strolls and dressier summer events.
- A tropical beach vacation
- A summer wedding with an ocean backdrop
- Poolside parties and yacht outings
- A weekend getaway to a coastal town
- Summer brunch with friends outdoors
Final Thoughts
Sunlit Waves & Ocean Breeze isn’t just a nail design—it’s a state of mind. Every gradient tip feels like dipping your toes into warm waters, every ripple reflects a lazy summer afternoon, and every bloom whispers of sunshine and gentle breezes. It’s wearable art for anyone who wants to carry a piece of paradise wherever they go.
Looking for more style inspiration and curated content? Discover the latest trends, how-to guides, and elevated edits—visit our blog page and explore more.